

Introduction
OhmPort is Ohmsense's management software for Berkeley Varitronics detectors. It retrieves snapshots and data-logging recordings from a Yorkie-Pro™ handheld, streams live RF readings from a TransitHound™, and stores everything in a single local database with maps, charts, watchlists and tamper-evident case files.
It comes in two editions that share one backup format:
- Desktop — native Windows and macOS app with no networking code at all. Use this for evidentiary and air-gapped work.
- Web — runs in Chrome or Edge with no install; your detector connects over Web Serial and records are stored in the browser's private storage on your computer.
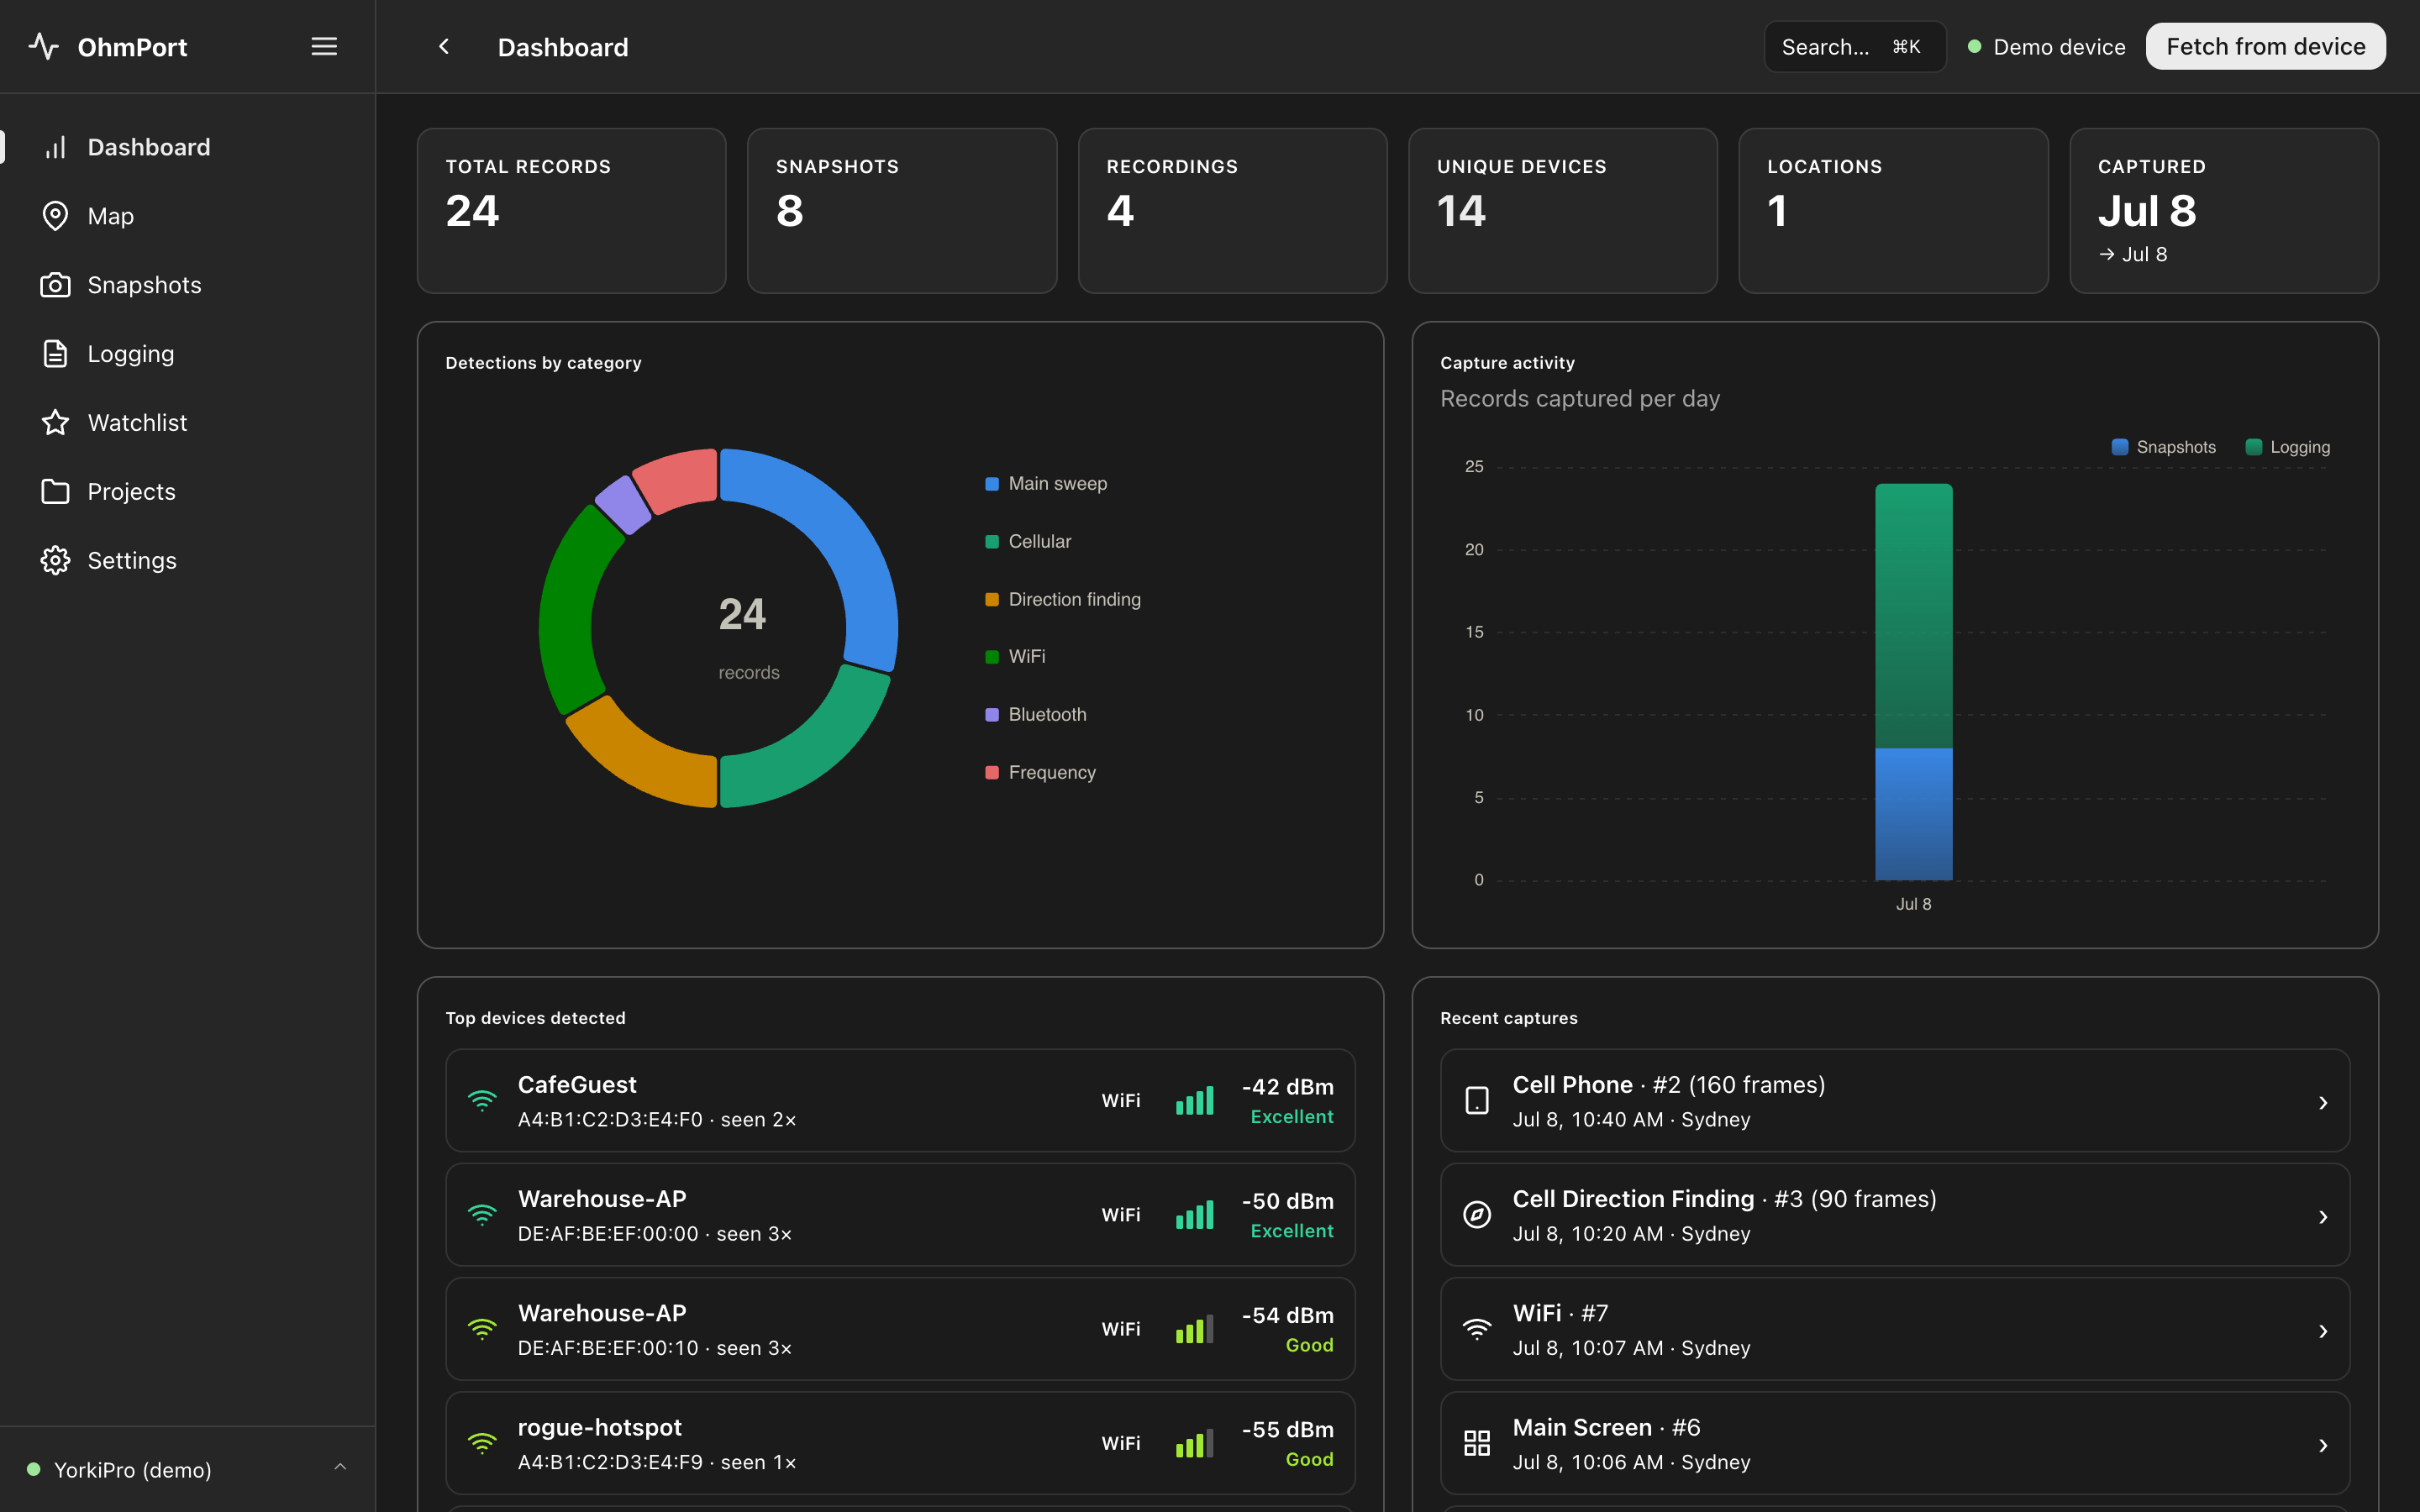
The dashboard summarises your whole evidence store: record counts, detections by category, capture activity, top devices and recent captures.
Installing OhmPort
Windows (10 or later, 64-bit)
- Run
OhmPort_<version>_x64-setup.exe. The installer bundles everything it needs, including the WebView2 runtime — no internet connection is required. - Windows SmartScreen may ask you to confirm the publisher. Only proceed with installers obtained directly from Ohmsense.
macOS (Intel & Apple Silicon)
- Open
OhmPort_<version>_universal.dmgand drag OhmPort to Applications. - On first launch, right-click the app and choose Open if Gatekeeper prompts you.
Web edition
- Open the OhmPort web app in Chrome or Edge on desktop (these support the Web Serial API used to talk to your detector). Firefox, Safari and mobile browsers can run the demo but cannot connect hardware.
- After your first visit it works offline, and you can install it as an app from the browser's address-bar install prompt.
First run & activation
A short setup wizard runs the first time you open OhmPort:
- Welcome — a summary of what the app does. Choose Get started, or Skip setup to go straight in.
- Activate — activation happens in your web browser on the Ohmsense portal, never inside the app. Copy your device serial (shown once a device is connected, or printed on the device label), obtain your licence on the portal, and paste the licence text into the app. You can also Skip for now and activate later from Settings — OhmPort then starts a demo YorkiPro automatically, so you land in a working app.
- All set — connect a device via USB and it is detected automatically.
If you previously used the legacy BVS manager application, OhmPort imports its database automatically on first run — snapshots, logs and notes carry over.
Connecting a detector
Plug your detector in over USB. OhmPort identifies the device family automatically and switches its workspace to match: a YorkiPro gives you Dashboard, Map, Snapshots, Logging, Watchlist and Projects; a TransitHound gives you Dashboard, Live monitor, Detections and Projects.
- The connection pill in the top bar shows the current device and state.
- The device switcher at the bottom of the sidebar lists detected devices, both demo devices, and both offline workspaces — you can review existing data any time, with nothing connected.
- In the web edition, the browser asks you to grant the serial port the first time — choose the detector's port when prompted.
Syncing a YorkiPro (snapshots & logging)
With a YorkiPro connected, click Fetch from device in the top bar. OhmPort retrieves the snapshots and data-logging recordings stored on the handheld, with progress shown in the sidebar; you can cancel a sync at any time.
- Choose what a sync retrieves under Settings → "Fetch from device" (snapshots and logging, or either alone).
- Re-sync freely — records already on your computer are deduplicated, so fetching again only adds what's new.
- System notifications (Settings toggle) tell you when a device is detected and when syncs finish.
Working with snapshots
The Snapshots page lists every captured screen mode — Main Sweep, Cellular, Cell Phone, Cell Direction Finding, WiFi, Bluetooth, Frequency Analysis and more — with time, place and capture number. Search, filter by date range, export the table to CSV or JSON, or delete individual records.
Open any snapshot to see its full detail view:
- Charts and analysis for that screen mode — signal levels, channels, detected devices, RSSI and deviation readings.
- Older / Newer to step through captures, and Compare to view two snapshots side by side.
- Add to project to copy the record into a case file (see Projects).
- CSV / PNG export of the data and chart for reports.
- Notes — attach a title and details to any record; notes stay with the record and are included in backups.
Reviewing logged recordings
The Logging page lists data-logging recordings pulled from the device, with page, frame and duration counts. Open one for Recording review — a playback view that steps through the captured activity frame by frame:
- Play/pause with an adjustable playback speed.
- Play active only skips straight between frames containing detections.
- Export the recording's data to CSV for analysis elsewhere.
The capture map
Records with a GPS fix appear on the Map page — sized by detections, coloured by record type, with a legend to toggle types and a date filter. Click any point to open the record behind it. Switch between the coordinate plot and a world-map view, and see a summary of surveyed locations by place name.
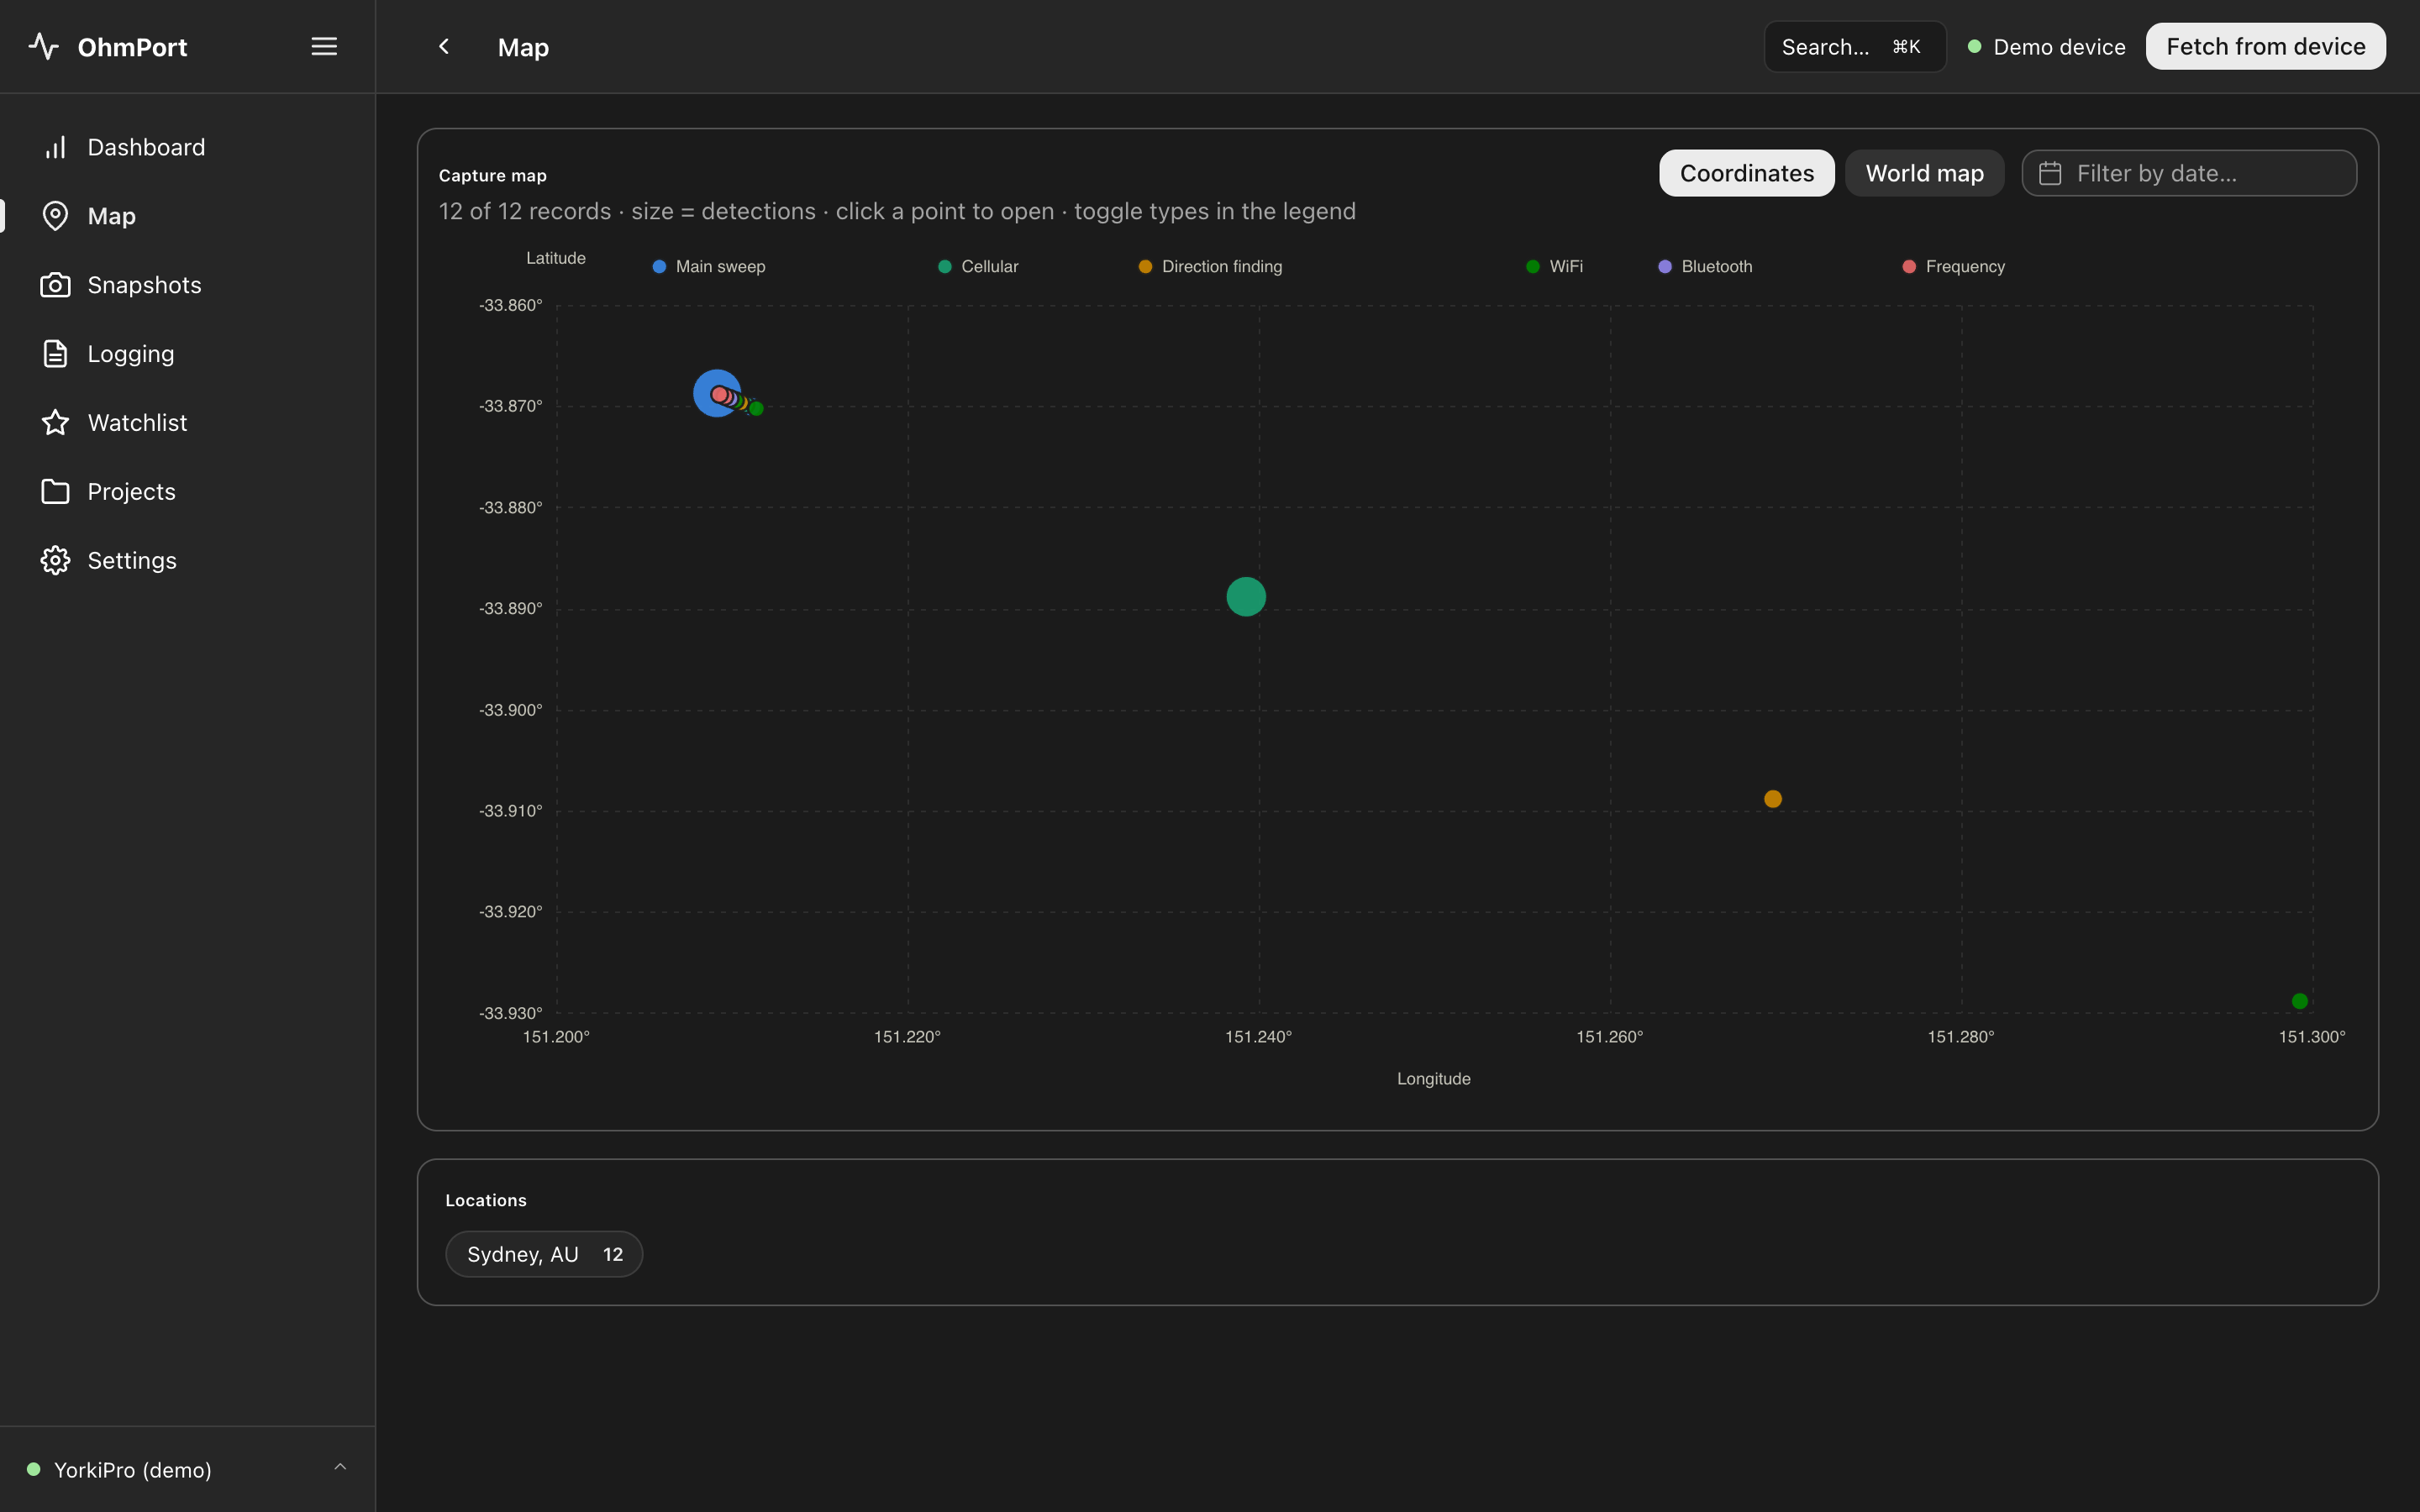
Place names come from a world-city database bundled inside the app — mapping and reverse geocoding work completely offline, with no tile servers and no lookups.
Watchlist
Star a WiFi access point or Bluetooth device on any record to add it to the Watchlist. Watched devices are highlighted everywhere they reappear — across snapshots, recordings and future syncs — so persistent devices stand out immediately. Manage the list from the Watchlist page.
Live monitoring with a TransitHound
Connect a TransitHound and open Live monitor, then press Start monitoring. The live chart streams signal readings against your thresholds, with a card per band — Cellular 800/900 MHz, Cellular 1800/1900 MHz, WiFi 2.4 GHz and WiFi 5 GHz.
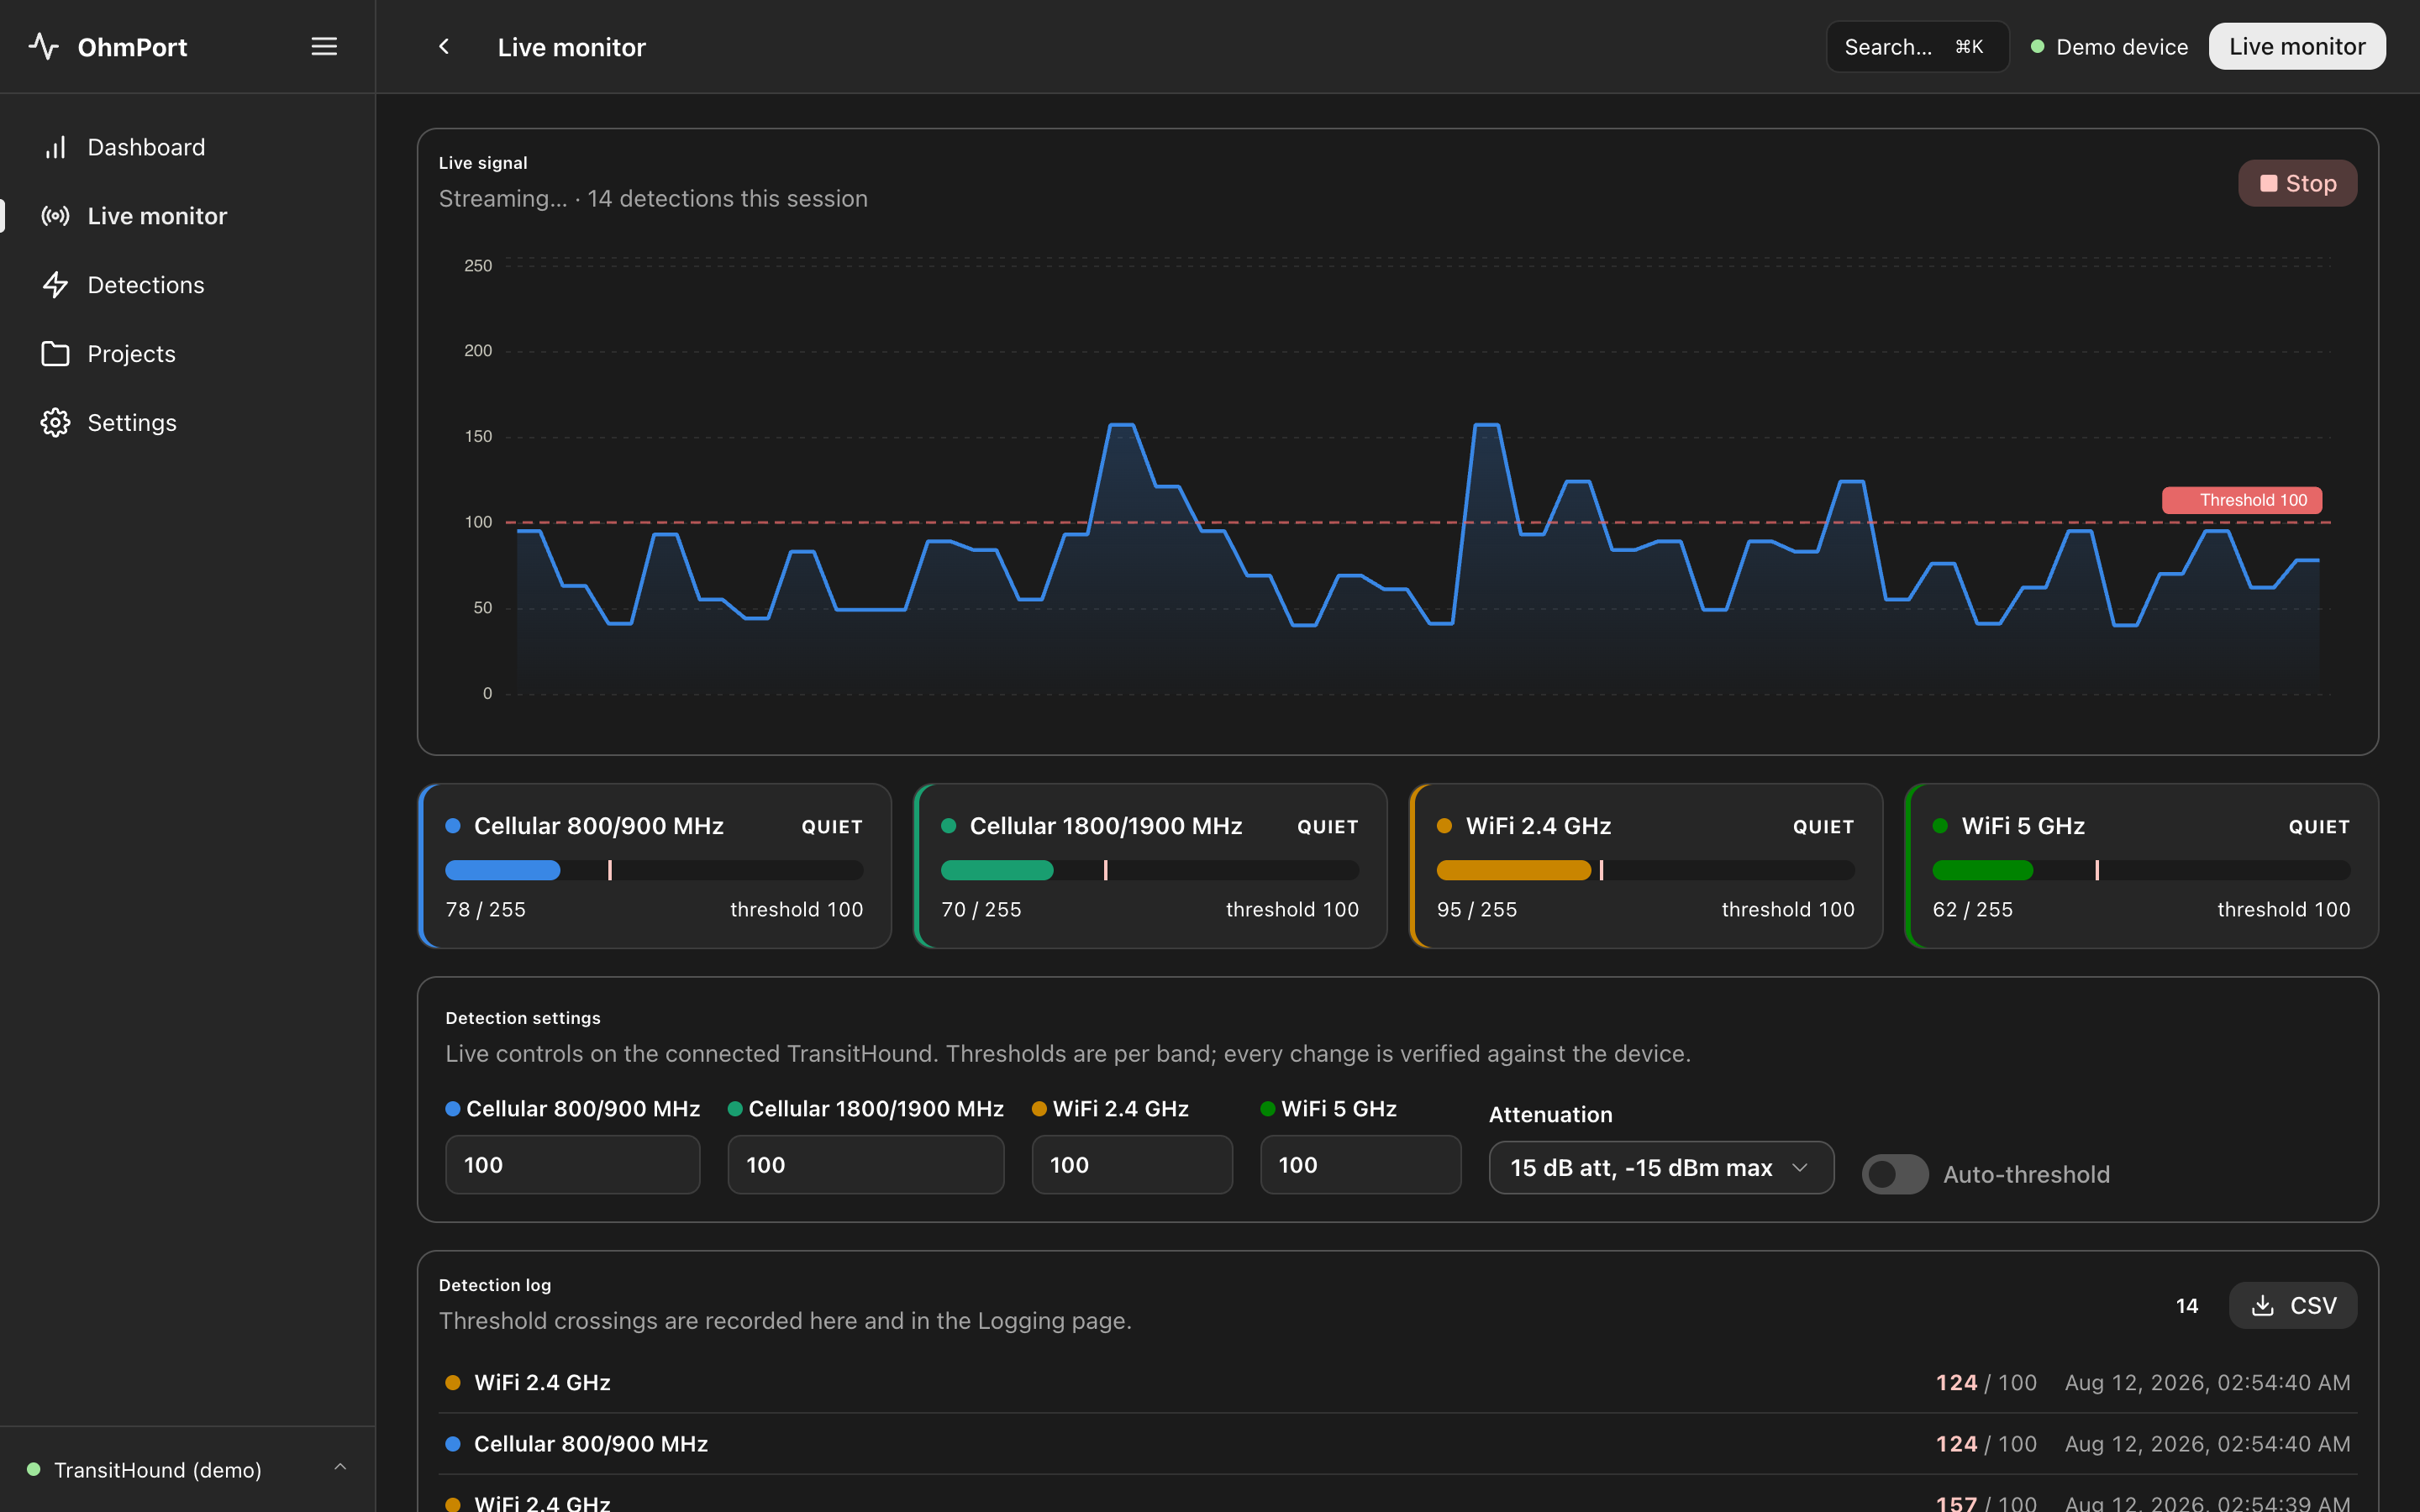
The live monitor: streaming signal, per-band status, detection settings and the session's detection log.
- Detection settings — set each band's threshold, choose the attenuation profile, or enable auto-threshold to calibrate against the noise floor. Every change is written to the device and read back to confirm it took effect.
- Rising / falling delays and auto-trigger margin — fine-tune how long a signal must stay above or below threshold, from the live device controls in Settings while a TransitHound is connected.
- Detections — each rising-edge threshold crossing is recorded once until the band falls quiet again. Review, export (CSV/JSON) or clear the log from the Detections page.
Projects & chain of custody
Projects are case files. Create one from the Projects page, then add records to it from any snapshot's detail view. A project holds copies of its evidence records plus a chain-of-custody log:
- Every action — records added, notes, changes — is recorded as an event with a timestamp and the operator's name.
- Events are hash-chained: each entry cryptographically commits to everything before it. The project page verifies the chain and shows whether it is intact; any later edit or deletion breaks the chain and is flagged.
- Set your name under Settings → Operator / investigator name so custody events are attributed correctly.
Search
Press ⌘K (macOS) or Ctrl K (Windows) — or click the search box in the top bar — to search across your records and jump to any page from one place.
Your data, backups & updates
Everything OhmPort stores lives in a single SQLite database on your machine:
| Edition | Where your data lives |
|---|---|
| Windows | %APPDATA%\com.ohmsense.yorkipro\ |
| macOS | ~/Library/Application Support/com.ohmsense.yorkipro/ |
| Web | The browser's private storage for the OhmPort site, on your computer |
- Manual backup & restore — Settings → "Back up data…" writes one portable
.sqlitefile containing records, projects, notes and settings; "Restore from backup…" replaces current data with a backup. Backups are interchangeable between the desktop and web editions. - Automatic upgrade backups — before a newer desktop version first opens your database, OhmPort snapshots it into a
backups/folder alongside the database, keeping the ten most recent. - Deleting data — Settings → Data management removes records from this computer only. To erase the detector's own memory, use "Clear device snapshots / logging" with the device connected.
- Web storage protection — in the web edition, use Settings → storage → protect from eviction so the browser treats your data as persistent, and export backups regularly. Clearing the browser's site data deletes the web edition's records.
- Updates are manual — the desktop app never checks for or downloads updates; install new versions yourself (your data carries over automatically). The web edition updates only when you reload the page.
Licensing
Licences are cryptographically signed files bound to your device serial, verified entirely inside the app — OhmPort never connects to a licence server. To activate: open the activation portal (from the setup wizard or Settings → License), enter your licence key and device serial there, then paste the issued licence text back into the app. The demo devices are free for everyone. For licences and volume enquiries, contact Ohmsense.
Troubleshooting
| Symptom | What to check |
|---|---|
| Device not detected | Use a data-capable USB cable, try another port, close other software that may hold the serial port, then replug. In the web edition, make sure you granted the serial-port permission and are using Chrome or Edge on desktop. |
| Web app can't connect hardware | Web Serial is Chrome/Edge on desktop only. On Brave, enable Web Serial in brave://settings. Firefox, Safari and mobile run demo mode only. |
| Licence shows invalid | Check the licence matches the connected device's serial, that today is within its validity dates, and that the whole licence text — including the BEGIN/END lines — was pasted. |
| Restore fails | The file must be an OhmPort (or legacy manager) backup — an ordinary .sqlite file exported by the app. |
| Custody log shows "broken" | The project's event history no longer matches its hash chain — treat the project's integrity as compromised and refer to your evidence-handling procedures. |
Still stuck? Contact Ohmsense — info@ohmsense.com.au or 1300 431 293.
More
- OhmPort overview — features, editions and screenshots.
- Security overview — network behaviour, data handling and evidence integrity, in detail.